This review starts, oddly enough, with a different jacket. The cardinal hardshell from Arc'teryx: the Alpha SV. A benchmark in the rugged hardshell category, and one that has been around for 20 years. With the Alpha line focused on climbing, and the Theta going away, a new general purpose severe weather hardshell made sense.
Born in the shadow of the Alpha SV and Theta SVX, the Beta SV is a well calibrated generalist. I've had mine for five months now, through the depths of an Albertan winter as cold as -40º C. Not content to merely wear the Beta SV, this review will attempt to understand it and the company that crafted it.
Figure 1
Stylized product branding on the inner pocket. In the Arc'teryx product stable the Beta series consists of versatile hardshells. SV means it is designed for severe conditions and contains the most features, extra coverage, and the highest durability.
Table of Contents
- Outside Construction
- Inside Construction
- Features
- Gore-Tex Pro
- Grab Bag
- Conclusion
Outside Construction
The Beta SV is a sleek piece and the design team clearly spent effort making it look good. It isn't too technical to wear around town. I have done so and it performs the role well, but is certainly overkill. Mine is approximately azure blue, they call it Rigel. The fit is Arc'teryx regular, so it is designed to be a bit loose with room to put a warm puffy and a fleece underneath.
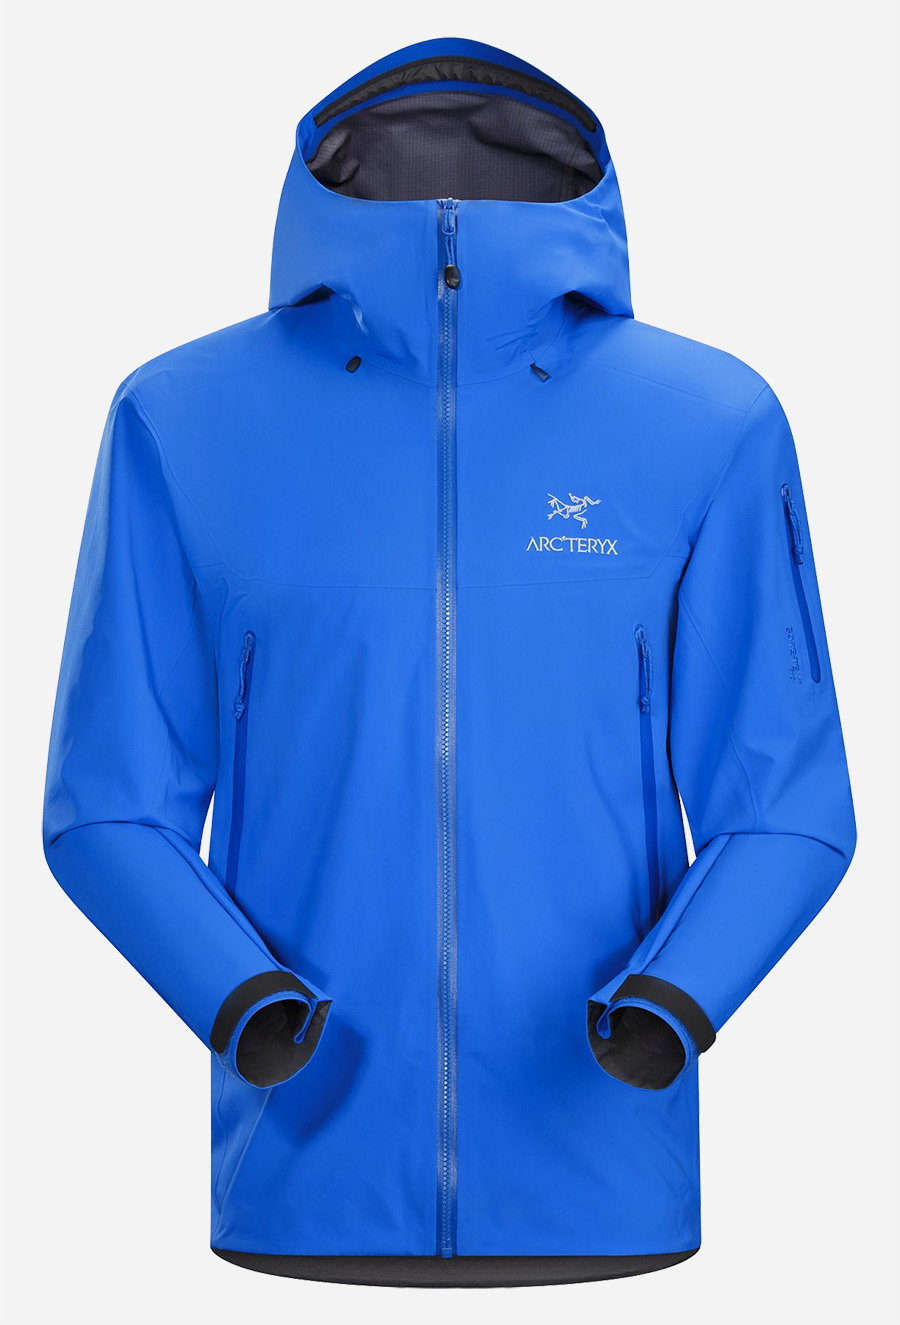
Figure 2
Image taken directly from the Arc'teryx product page. I can't take a better overall product photo than this with my equipment.
The face fabric is a burly 80 denier nylon. Not the highest in the industry, but certainly at the upper end. Most jackets use a 20-40 denier face, so 80 is a significant jump. This is a plain weave, it is very tight and does not lose thread integrity at all easily. In the Arc'teryx line only a few items are more robust, and with the express purpose of hugging rocks and ice all day. Being a generalist, the Beta SV gets the most robust general purpose fabric. This fabric is a bit loud, but does quiet down somewhat over time.
I have pushed through trees, scraped against rocks, slid on ice, and landed on concrete. The jacket shows no signs of wear. Large exuberant dogs jumping all over with claws out has not fazed it. Nor has accidental contact with a knife blade or a mechanical drafting pencil tip. It is at home blasting through foliage on the slopes, bushwhacking, or climbing a rock face. Not quite up to Alpha SV standards for climbing, but the Beta SV would get it done if you wanted (which is the point of this jacket).
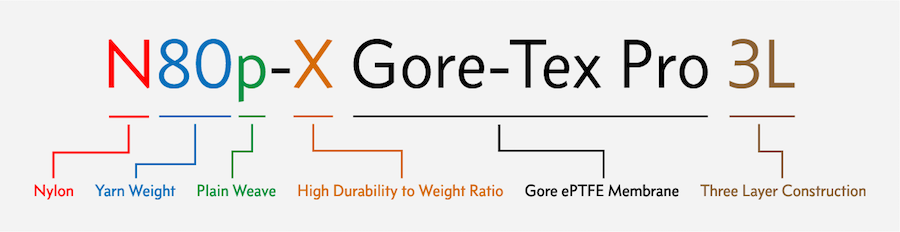
Figure 3
Breakdown of the Arc'teryx materials naming scheme. Further details below on Gore-Tex Pro.
All of the seams across the face of the jacket are closely and evenly stitched at around 15 stitches per inch. This is a generous number for thick, beefy nylon. The seams are very tight, consistent, and flush showing good workmanship. Time was taken to line up and overlap the fabrics properly, and perhaps do minor trimming as necessary. At a rudimentary level this jacket is pieces of fabric stitched together. Those core elements of seam building must be good for the jacket to be good. And they are.
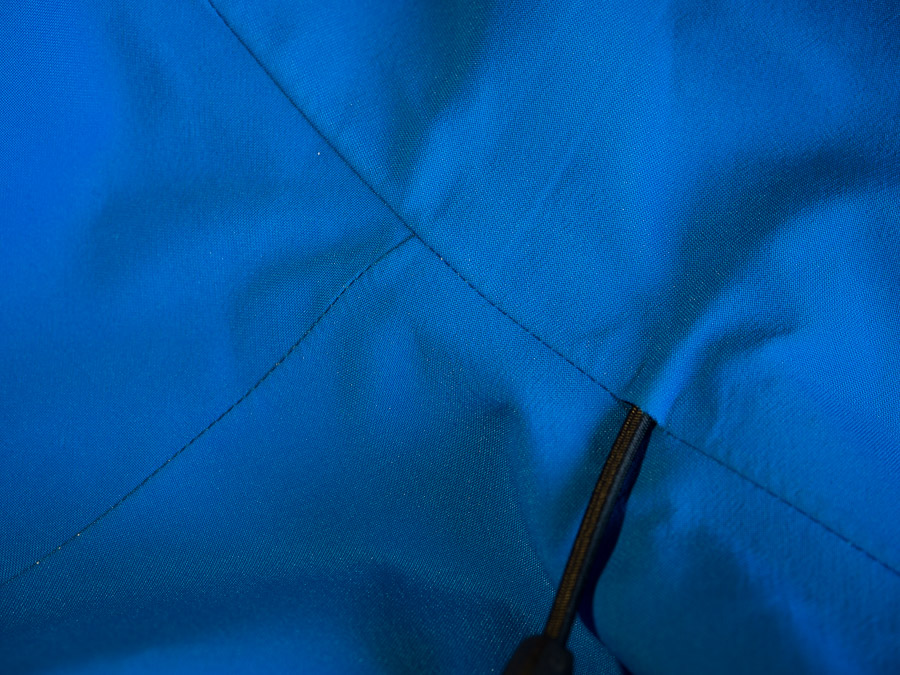
Figure 4
Close up of seams and nylon face. This jacket has seen considerable use, and the seams remain good.
Looking at the patterning, there are plenty of clever touches. The way the underarm panel is integrated into the torso creates a series of triangular gussets in the fabric. Although not an actual additional fabric gusset, it works just as well as one. Additionally the elbow panel is designed in an interesting way. It has triangles cut out of the panel which are then sewn together forming nearly a 3D dome for the elbow to rest in. This lets your arm articulate without binding or pulling.
Some additional cleverness is present in the way the torso and arms meet. The upper back panel is wider than normal and the arm openings are further forward on the torso. This allows you to reach inwards or across with no restriction and no bunching at the inside of the shoulder. The shoulders have few seams for backpack strap friendliness.
The bottom hem is long, covering the butt and upper thigh. Those who like the Theta series because of its length will also like the Beta SV. Sleeve length is long as well, and folks with long arms will find the coverage to be enough. Folks with shorter arms like myself will have more fabric than they need, but the velcro cuffs allow you to control that.
Included is a beefy waterproof front zip with large teeth. It is not a double zip, but I prefer it that way. It starts easily every time, runs smoothly, is never misaligned. I find this zipper to be entirely unimpeachable, and given the number of times the main zip is a problem on jackets, that is refreshing. Notably none of the waterproof zippers have garages. They are all of the new RS zipper type from Arc'teryx and seal with a muted click at the end of the travel. Because the zippers are self-sealing, there is no need for garages.
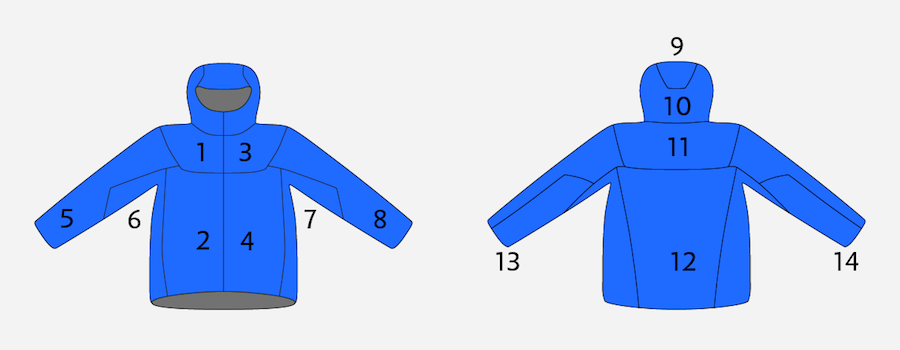
Figure 5
Approximate panel location and count. 14 is an impressively low amount considering the fit of this jacket.
No jacket is complete without adjustment, and the hood has the highest density of elastics. The cant adjuster terminates at the crown adjuster. The crown elastic links up to the hood side elastics. Both the crown and hood side elastics run through the brim so both of them will influence how protective the hood becomes when pulled. This design uses as few channels as possible to create as much adjustment as possible. Inside the back of the hood there is a second layer of fabric which is so perfectly attached that the micro grid pattern lines up. This must be how the elastics are inserted.
There is also has an elastic drawcord at the bottom hem, which has metal grommets and runs inside a secondary ripstop nylon sheath. My 2013 production Theta AR had an elastic drawcord at the waist of the jacket. I would always bring that elastic in a bit because otherwise the torso was too baggy. The patterning of the Beta SV makes the waist a bit smaller, which removes the need. There is no waist elastic.
On the chest is an Archaeopteryx skeleton and Arc'teryx wordmark, nicely embroidered into the fabric with a contrasting color. The only other brand callout is the color-matched Gore-Tex Pro wordmark embroidered into the left sleeve next to the bicep pocket. Both of these are of high quality and have a sealing patch behind them to prevent any leakage.
Inside Construction
As with all Gore-Tex Pro products, the inside consists of Gore's micro grid backer. This is a gray nylon with a small square grid pattern of darker threads. It is meant to be rugged, and to slide easily against other layers, I can attest that it does both of these things well. It can still feel slimy and unpleasant against bare sweaty skin, so a long sleeve baselayer to manage moisture is always recommended with shell jackets.
Sewing puts holes in the fabric, which would leak if left unattended. Seam tape is used to patch over the holes and prevent them leaking. I inspect to be sure that the tape tracks true with seams, and stays centered on them. That the tape does not attempt to cover a spot which is too proud of the surface. And that the adhesion of the tape is consistent and complete. All of these things are true for the Beta SV throughout. The seam tape is also narrower and flusher than most jackets.
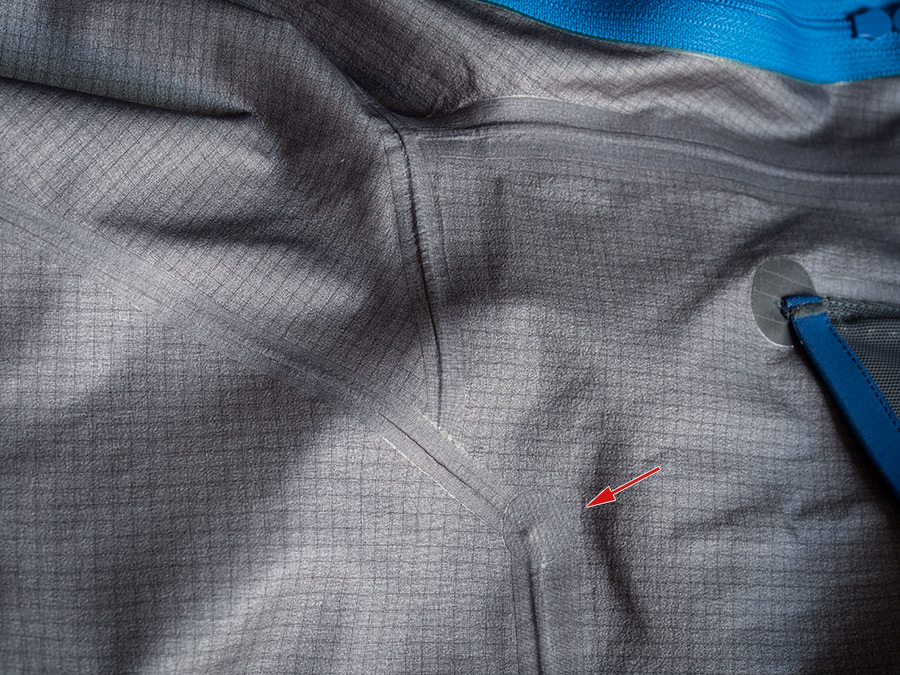
Figure 6
Seam tape and micro grid backer in the torso. Note the circular patch (red arrow).
As an added bonus, I can not find any three way (or more) seam tape junctions in this jacket. It is normal to find these in the collarbone area or under the arms, and they are inherently weaker and harder to handle than a two way junction. Arc'teryx handles them by simply not having any, the jacket is carefully patterned to bring seams together offset. Whenever possible, seams are also used to terminate things like pockets and elastics, reducing the need for more stitching. Finally, there are several seam tape junctions that receive an additional circular reinforcement patch, which is a nice touch.
Adhesives is a bit of a dirty word in the public lexicon, but in truth our hatred is of bad adhesives and bad techniques. High quality adhesives, used correctly, are stronger than the materials they are adhering to. Arc'teryx uses adhesives and lamination extensively in their construction. Most likely a form of thermoset adhesive with dies to apply heat and pressure precisely in the right areas. The pit zips are entirely constructed without stitching, so are the bottoms of the front pockets. Also the internal zip pocket, hood brim, most of the bicep pocket, and most of the mesh drop pocket.
A key to adhesives is that area equals strength. In most of the places where we see adhesives used, there are circular patches in place to provide additional bonding area. Top and bottom of the pit zips, drop pocket, bicep pocket, and bottom of front pockets all receive a boost in robustness. The pit zips especially have comically oversized patches, but really that can only be a good thing.
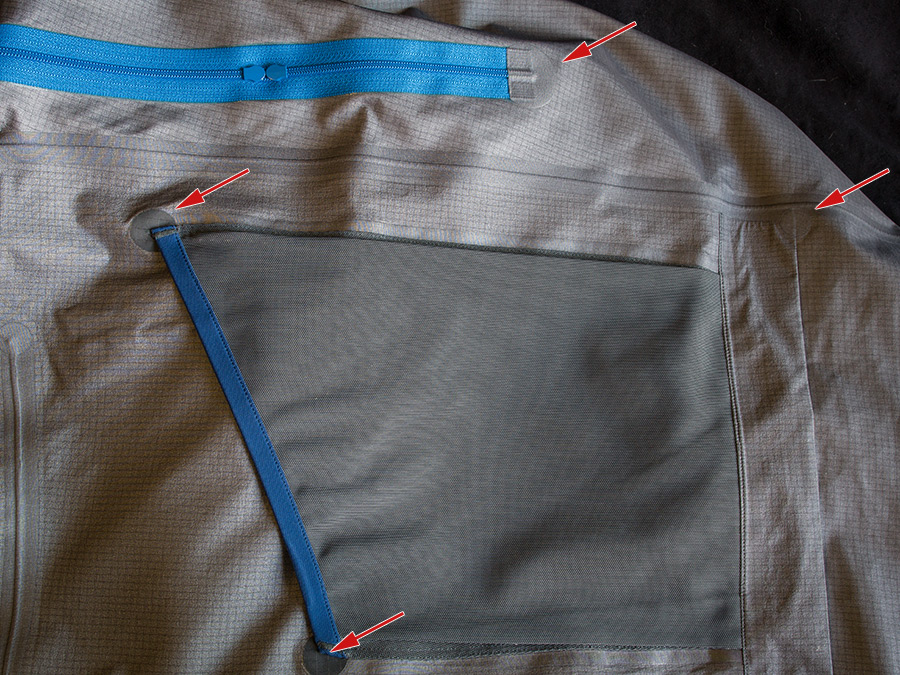
Figure 7
There are circular patches reinforcing many elements (red arrows).
The front pockets are very large, and extend to the panel seam on three sides. At the bottom they use an adhesive with reinforcement. Notably the front pockets have bellows at the bottom, so they can hold bulky items comfortably. The other torso pockets are internally stacked on top of the front pockets. Sweating the details here, the bottom of the mesh drop pocket is stitched. However, inside the front pocket there is seam tape on that stitch line. I suppose if the inside of your pocket gets damp, it won't travel through and get you damp also.
This is a good place to note that there is an order to the construction. It looks like you can not easily assembly-line some of the steps. They have to come together at the same time at the same workstation. This would mean expanded skill and judgement from employees. It is impossible to build sophisticated outerwear economically without thinking carefully about how to make it. Designing for manufacturability is difficult, few organizations do it well. Arc'teryx demonstrates skill and consistency designing for manufacturing.
Features
One of the hardest components of a jacket to get right is the hood. The head has to articulate in many directions, and the hood must follow without impinging visibility. Encompassing a helmet is important, but it also needs to work without. A hood must cinch down to defend against a blizzard, but loosen to shield only mild precipitation. With a conflicting array of requirements, it is normal to find compromises in hood design.
This hood is voluminous at full size, and can swallow most sorts of helmets. I even got my bike helmet into it with some coaxing. However, you can draw down on the hood in three ways.
The first, and likely most important for comfort, is the control at the back of the neck ( figure 8, annotation 2 ). This pulls an elastic running up the back of the hood and sets the overall cant and volume of the hood. As you pull fabric is taken up, the hood comes back which decreases its height. Without a helmet or a hat you have to pull this quite a bit to get it to a satisfactory place, but it is doable. Pull this when you find the brim creeping into your eyes. Loosen it when the brim does not overhang your face.
The next setting is at the back of the head ( figure 8, annotation 1 ), and sets the tightness of the crown. This is an elastic ring around the top of the hood which grips your head and keeps the hood in place, it also allows the hood to turn with your head at tighter settings. Pull this when the hood is not staying put, or when the hood does not follow your head. Loosen it if your head is being squeezed too much, you need to add a helmet/hat/hood underneath, or if it's hard to put on.
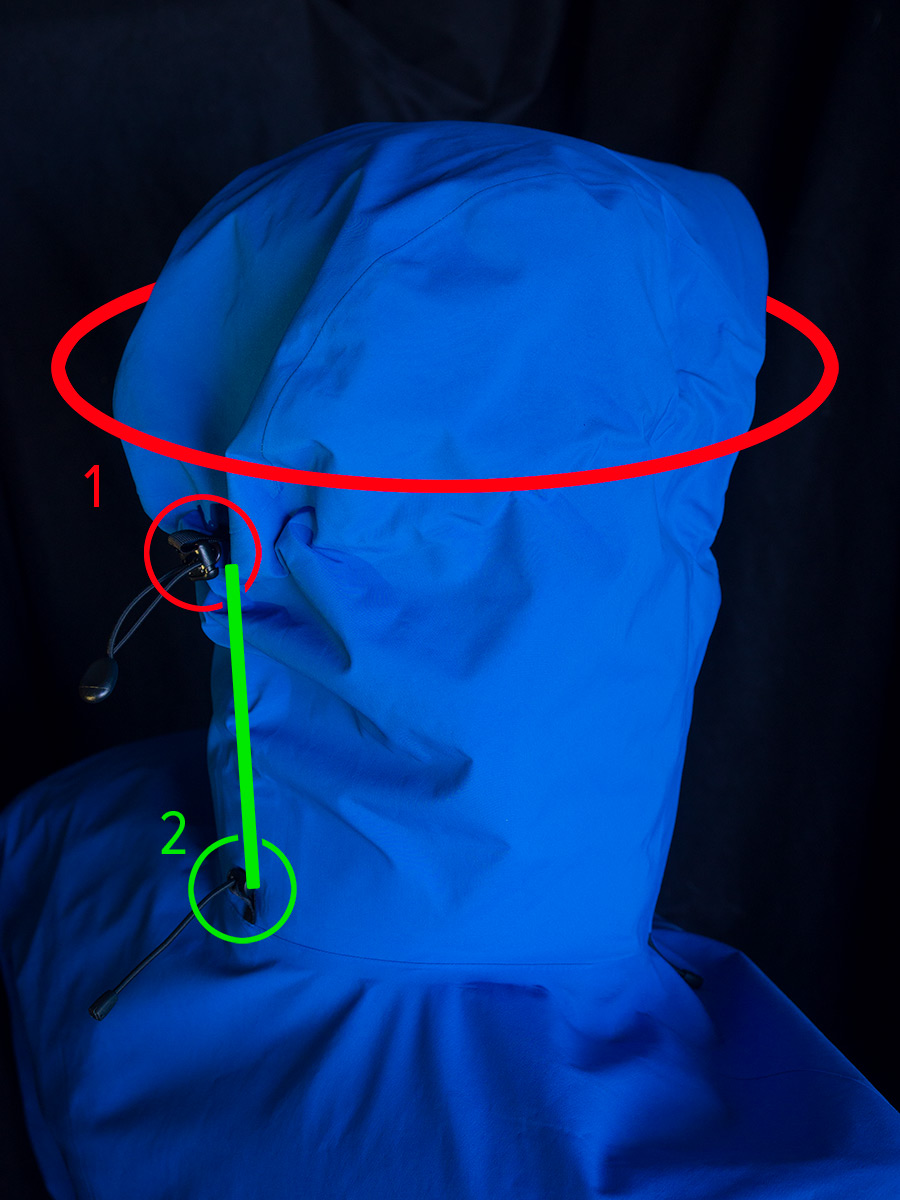
Figure 8
Annotation 1, in red, shows the path of the crown adjustment elastic. Annotation 2, in green, shows the path of the hood cant/size adjustment.
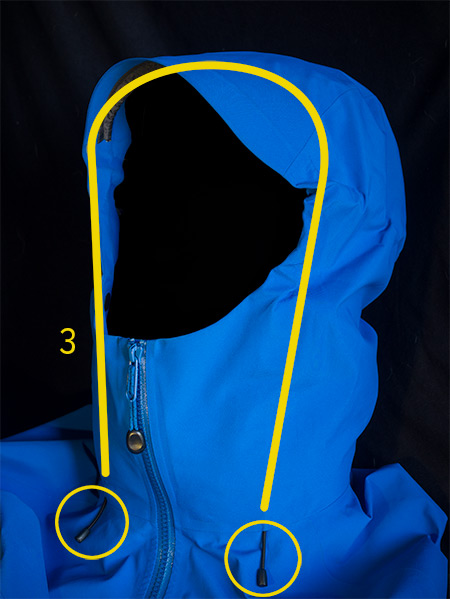
Figure 9
Annotation 3, in yellow, shows the path of the elastic that adjusts the sides of the hood. Both this, and the crown elastic interact with the hood brim.
Lastly, there are the two side pulls approximately at the collarbones ( figure 9 ) which seal in the face opening. These use Cohaesive cordlocks and can be actuated with gloves easily. A quick note on the Cohaesive style of elastic lock, you can't really just pull them and have them stay. You have to first squeeze the cordlock, then pull to your desired tension, then release. They will now stay set without issue. It's a good design, and this isn't a knock against it, but it can be frustrating to set them if you don't know the trick. The actual plastic pull tabs are a bit small and they are difficult to find with big gloves on, I would suggest larger pull tabs in a future revision. Pull these if wind or precip/snow/dust is getting into the hood, or the hood is not staying put. Loosen if the conditions do not require it, or if the whole weight of the jacket is on your head.
The Beta SV has a StormHood, and I strongly prefer this. The DropHood on the AR has problems with nesting hoods. Coverage is exceptional with the StormHood design as well. When you zip up the jacket all the way and pull the elastics, the front zip can be above your nose. With goggles you barely notice howling wind, and the jacket truly is a bunker.
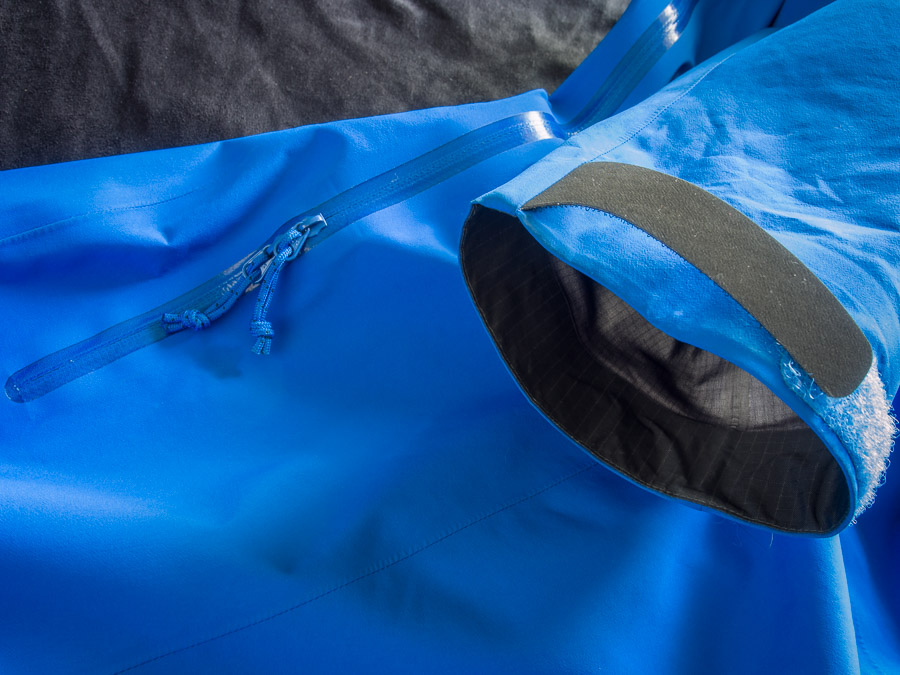
Figure 10
Jacket cuff and pit zip.
The inside of the zip at the top has a nice felt chin guard. The hood brim is fairly rigid and wide and its work is beyond reproach. At the base of the neck the hood has another nice little felt piece for comfort. It also includes a hang loop, and basic informational markings such as size.
Being a fully featured high-end jacket, this one comes with generously long pit zips. They are waterproof, so no storm flap to bunch up and annoy. They are positioned well to avoid precipitation leaking in, and also to not act like air ducts if you're moving at speed or in the wind. Maximum convenience is offered by having two zippers per side, so wherever you park them it is easy to open. As with most pit zips the ease at which these operate varies based on your technique and the jacket's fit. Arc'teryx is just the right company to develop an innovative way to improve the awkward experience of pit zips. I can hope, anyways.
The cuff ends close down as necessary, and the velcro is wide and long for lots of adjustment. The velcro is actually Velcro® branded so it is tenacious and robust unlike generic "hook and loop" systems. Some jackets create a bulky lump of excess fabric at the cuff when you close them down, and that is not the case here. The cuff neatly rolls over itself and gets out of the way. There are more details in the cuff as well. It's not a flat oval and has some 3D shape to it. The hook side of the velcro is shaped such that it has wide and strong stitching fixing it to the jacket, but doesn't abrade against your hand. Inside the cuff there is another darker grid nylon. Hopefully this reinforces the cuff and keeps sweat and dirt out of the membrane as long as possible. Cuffs get dirty quickly.
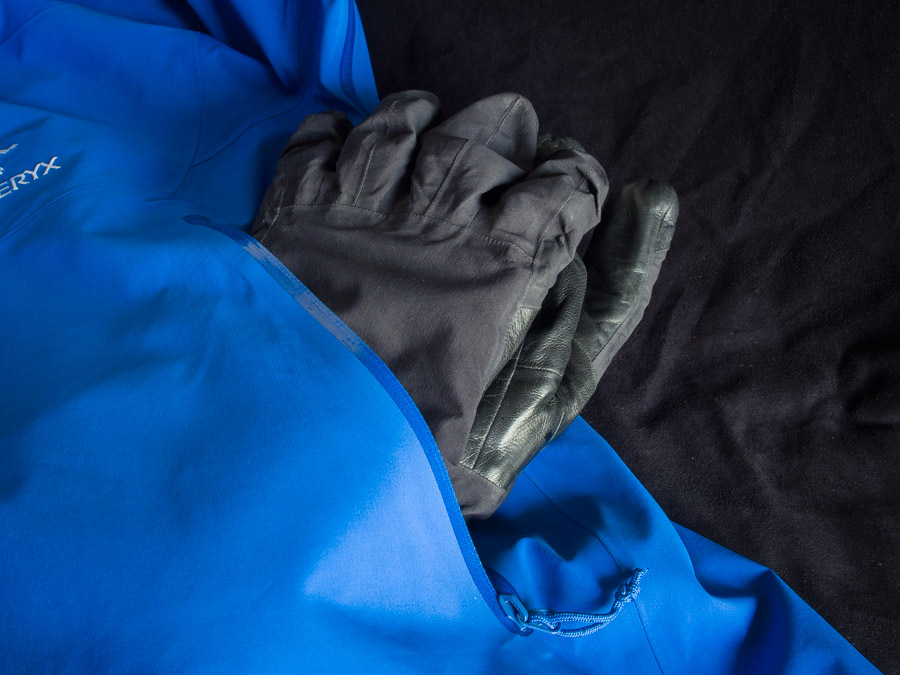
Figure 11
Torso outside hand pockets with gloves.
There are two large outer hand pockets that measure 34cm tall by 24cm deep with a 22cm opening. The zips are waterproof and positioned at your sides. This compared to the Alpha SV which has the primary zippers in the center upper chest. It's a compromise; the center design lets you easily access the pocket without throwing off your center of gravity, or sitting in a lift chair without disturbing your partners. The side zippers let you put your hands in your pockets to protect them from a chilly wind. All of the designs here work with a backpack.
Inside there are two further pockets. Left is a zippered pocket which is 18cm tall and 13cm deep with a 14cm opening. No bellows, so low profile items only, a great phone or wallet pocket. Right side has a mesh drop pocket which is 17cm wide and on average 22cm deep with a 17cm opening. It is stretchy and has side bellows so it expands to fit quite a lot. Gloves, ski goggles, a map, even a water bottle or some snacks. The pocket opening is diagonal with the pocket shallower closer to the front zip and deeper furthest from the front zip. This makes it easy to put unwieldy objects in yet still holds them securely.
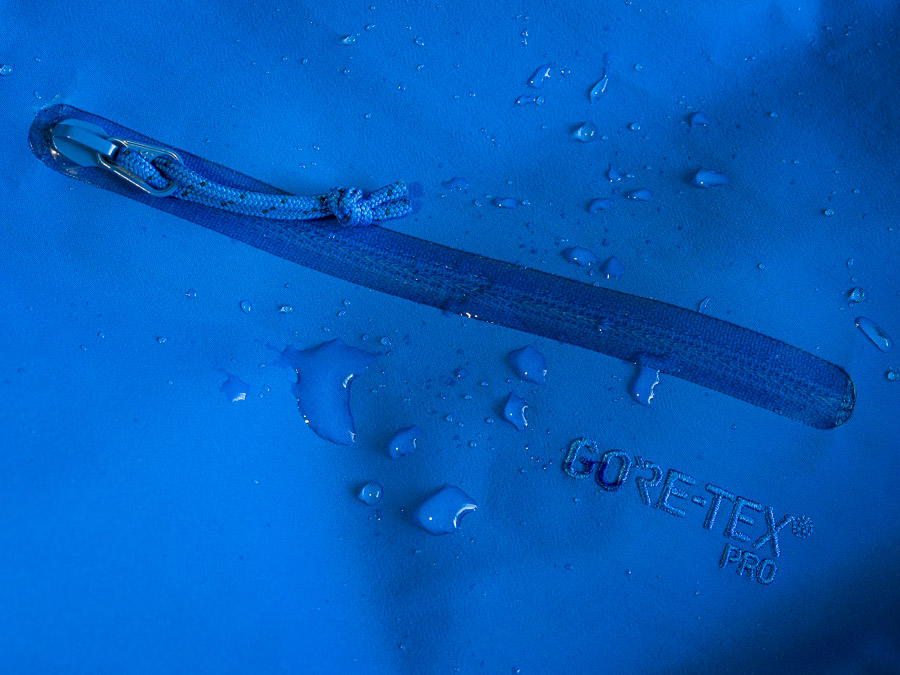
Figure 12
Bicep pocket on left arm.
A bicep pocket is present on the left arm, sporting a waterproof zipper. It is approximately 24cm long by 12cm deep with a 13cm opening. This pocket does not have bellows either so it will not hold a huge volume. It is great for things like a small flashlight, lift pass, wallet, and it holds a normal size phone without issue also. Anything in this pocket will be slightly uncomfortable against the arm, and could be damaged (or injure you) in the case of a fall or a collision (perhaps not a good phone pocket). It can also be a little hard to open or close and should be addressed in a similar way to the pit zips. Make the fabric taut then zip.
Gore-Tex Pro
The waterproofing technology used in the Beta SV is Gore-Tex Pro 3L. The 3L means it has three layers ( figure 13 ), that is to say an outer nylon textile that you see as the outside of the jacket. An inner nylon textile that you see as the gray micro grid liner. And sandwiched between them is the Gore-Tex Pro membrane. The membrane is made of expanded Polytetrafluoroethylene, usually shortened to ePTFE. Basically they take a sheet of teflon and stretch it out until it's really thin. In the case of Gore-Tex Pro, two sheets are stacked together with a thin separator layer of unknown composition.
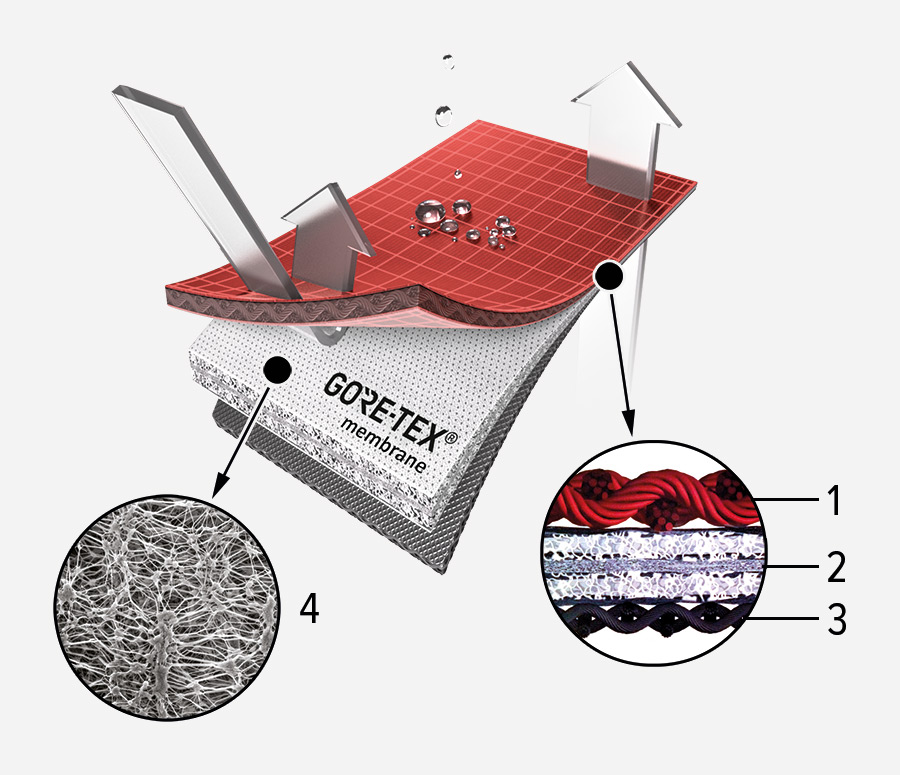
Figure 13
Gore-Tex Pro 3L breakdown. Annotation 1 is the outer face textile. Annotation 3 is the inner micro grid textile. Annotation 2 is the ePTFE membrane. Annotation 4 is a picture of Gore-Tex under a microscope showing its porous structure. This image is a composite of marketing materials from W. L. Gore and Associates.
The idea behind ePTFE is that it is macroporous and hydrophobic. The pores in Gore-Tex are about 200 nanometers (nm) in size. Whereas a water molecule in the air is less than 1nm. That water molecule can easily pass straight through the pores in the membrane. Therefore the humidity your body generates is able to leave, and you can stay cool. On the other side, a water droplet is about 500 000nm. Which is much larger than the membrane pores. Liquid water has strong intermolecular forces so small numbers of molecules will not leave the droplet. Therefore the membrane is waterproof.
That is all a bit of a simplification. Modern waterproof membranes must answer questions about breathability, contamination, air permeability, and long term durability. Many competitors to Gore-Tex have appeared in the last decade, most of them offering improved breathability. For this jacket and its SV designation, only Gore-Tex makes sense. Gore's focus on durability is a natural fit. Is it breathable? Yes definitely. The most breathable 3L jacket out there? No, certainly not. But it's not trying to be.
Breathability is subjective, so this is my experience: With low to moderate activity at cooler temperatures, I can leave the Beta SV on and be just fine. For moderate to high activity, I will overheat pretty quickly. Hiking a rolling trail, downhill skiing, level snowshoeing, or easier biking is fine with venting up to about 10°C. Hiking with substantial elevation gain, trail running, and skinning all overwhelm the jacket above freezing. That's pretty good performance, and about what you expect from any serious hard shell. I have other shells which are more breathable, but they aren't nearly as durable, and honestly they don't extend the activity range that much. The vapor barrier required to be waterproof is substantial, no matter if your membrane is air-permeable or not. If you run cool or are in better shape, the jacket may allow more intense activity. If you run hot or are in worse shape, perhaps you will overheat sooner.
Grab Bag
Inside the left pocket are the full tags with care instructions and identifying marks. Happily Arc'teryx are now printing the name of the garment directly on to the tag, which should reduce the sea of "which jacket is this?" questions. The proper care instructions are on the tag, but also covered in their excellent video. They are: machine wash in warm water using a detergent that does not contain any brighteners, whiteners, fragrances, or any other additives as these can clog the pores in the membrane. Technical washes from Grangers, Nikwax, and similar are a safe option. Double rinse is critical, sometimes I single rinse then run the jacket a whole second cycle with no detergent. Tumble dry set to medium, never use fabric softener as it can also clog the pores in the membrane.
Arc'teryx has publicly said that the Theta AR is being discontinued. I expect the Beta SV to take over the all-purpose extended coverage role. The Beta SV was released in 2016 and has never been revised as of this writing.
The Beta SV line is made in China. I do not inherently think this is a bad thing. With proper capital investment, training, management, and quality control, you can make good things anywhere. I have heard that Arc'teryx has a special relationship with their Chinese manufacturing. The retail floor samples of Canadian-made Alpha SV and Chinese-made Beta SV showed no quality differences. This is something to watch and be loud about if there is ever a quantifiable difference.
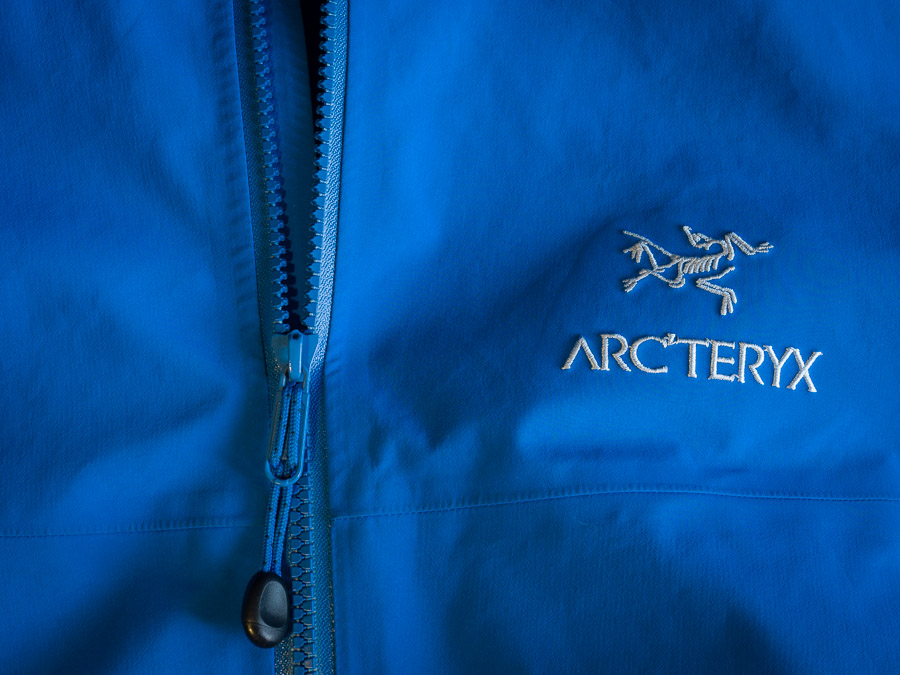
Figure 14
The front main zip and a prehistoric bird.
Conclusion
The Beta SV is very expensive. I believe it is worthwhile; you aren't buying just another jacket. You are investing in a garment that should last you a decade. You are investing in impeccable after-sales support and a warranty department that has few equals. You are investing in one of the few products that exemplifies a holistic approach to design, such that every aspect is considered and flows together. But you have to use it. Owning this jacket for walking to and from the parking lot is not reasonable.
Ultimately this specimen is symptomatic of the company's health. Products don't become well honed by accident, or on the first try. They are the result of an institutional commitment to process. Warranty intake, use in the field, customer response, all entering a loop that feeds back into product design. Thinking with focus about the intent of a design and its life cycle. No company produces only great products, and so every company must be judged on the merit of each product.
This is a phenomenal hard shell. No hesitation, no hedging. It will isolate you from the worst possible conditions, and it will allow you to work, play, or survive all the while.
Figure 15
See you out there.